This Tutorial adds Cut, Copy and Paste support to Text Editor (Part One), please follow all the Steps of Text Editor (Part One) and then start this Tutorial or use the Source Code from Part One, you may need to go to Project, then Properties... and change the Target Silverlight Version to Silverlight 4.
Printer Friendly Download Tutorial (144KB) Download Source Code (6.62KB) Online Demonstration
Step 1
Start Microsoft Visual Web Developer 2010 Express, then Select File then Open Project... Select the Solution File for Text Editor (Part One)
e.g. TextEditorPartOne.
Alternatively follow and complete the Tutorial for Text Editor (Part One), see below:

Step 2
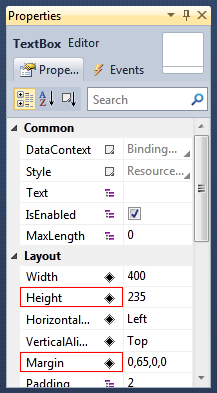
Click on the TextBox, then goto the Properties box and change the Height to "235" and change the Margin to "0,65,0,0" (both without the quotes), see below:
Step 3
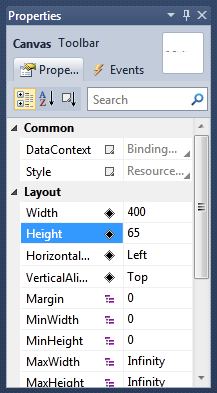
Click on the Canvas (Toolbar) above the TextBox, then goto the Properties box and change the height to 65, see below:
Step 4
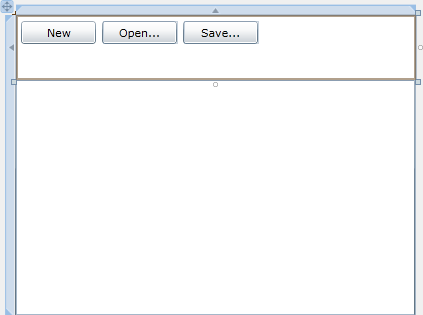
The MainPage when the TextBox and Canvas Properties have been changed, should appear as below:
Step 5
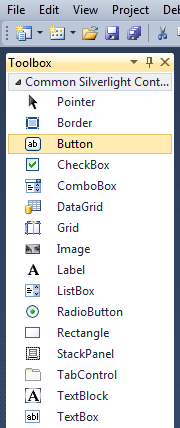
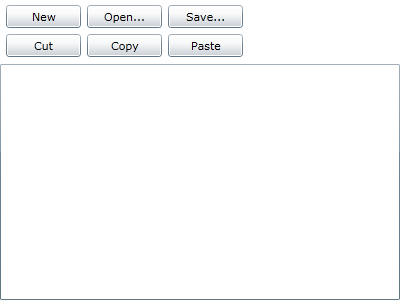
Then from the Common Silverlight Controls section in the Toolbox select the Button control:
Step 6
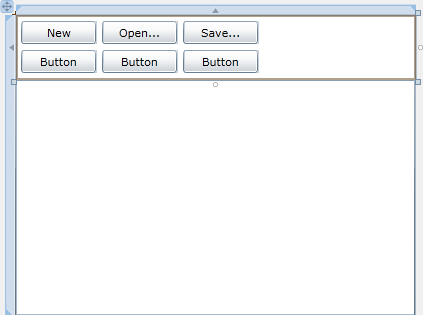
Draw Three Buttons on the Page by dragging the Buttons from the Toolbox onto the Page, so they appear below the "New", "Open..." and "Save..." buttons, or in the XAML Pane below the last "<Button>" tag and above the "</Canvas>" tag type the following:
<Button Canvas.Left="6" Canvas.Top="35" Height="23" Width="75" Name="Button1" Content="Button"/>
<Button Canvas.Left="87" Canvas.Top="35" Height="23" Width="75" Name="Button2" Content="Button"/>
<Button Canvas.Left="168" Canvas.Top="35" Height="23" Width="75" Name="Button3" Content="Button"/>
See below:
Step 7
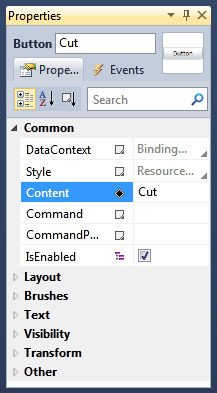
Click on the first new Button (Button1), then goto the Properties box and change the Name to "Cut" and the Content property from Button to "Cut" (both without the quotes), see below:
Step 8
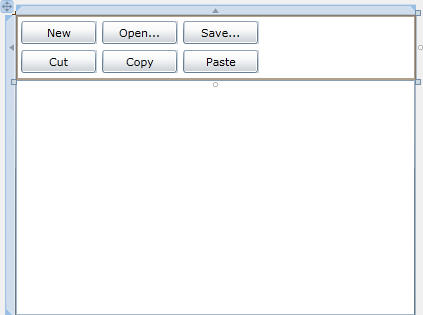
Click on the second Button (Button2), then goto the Properties box and change the Name to "Copy" and the Content property from Button to "Copy". Then click on the third Button (Button3) and goto the Properties box and change then Name to "Paste" and the Content property from Button to "Paste" (all without the quotes), the page should appear as below:
Step 9
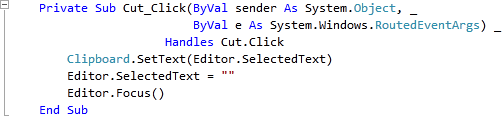
Double Click on the "Cut" Button Control and type in the Cut_Click Sub:
Clipboard.SetText(Editor.SelectedText)
Editor.SelectedText = ""
Editor.Focus()
See Below:
Step 10
Return to the Designer View, by selecting the "MainPage.xaml" Tab, or Right Click on the Page or the Entry for "MainPage.xaml" in Solution Explorer and choose the "View Designer" option.
Double Click on the "Copy" Button and type in the Copy_Click Sub:
Clipboard.SetText(Editor.SelectedText)
Editor.Focus()
See Below:

Step 11
Return to the Designer View again, by selecting the "MainPage.xaml" Tab, or Right Click on the Page or the Entry for "MainPage.xaml" in Solution Explorer and choose the "View Designer" option.
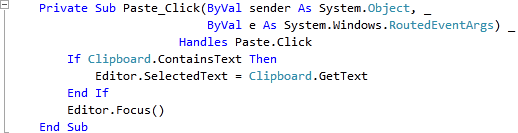
Double Click on the "Paste" Button and type in the Paste_Click Sub:
If Clipboard.ContainsText Then
  Editor.SelectedText = Clipboard.GetText
End If
Editor.Focus()
See Below:
Step 12
Save the Project as you have now finished the Silverlight application. Select Debug then Start Debugging or click on Start Debugging:
After you do, the following will appear in a new Web Browser window:
Step 13
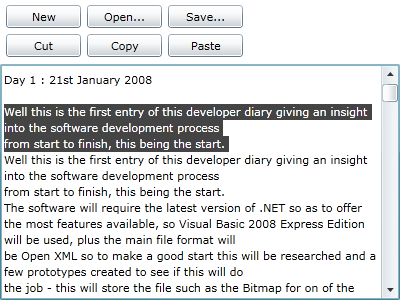
Now click where it says "Open...", a File Open Dialog - then select a Plain Text File or ".txt" file on your Computer and select Open and the contents will appear in the TextBox then Select some Text and click "Copy", then click "Yes" to allow the application to access the Clipboard, then click "Paste" to Paste the Text, see below:
Step 14
Close the Browser window by clicking on the Close Button ![]() on
the top right of the Web Browser to Stop the application.
on
the top right of the Web Browser to Stop the application.
This tutorial extended the Text Editor to add Clipboard support. You could also add other functionality to this Text Editor or use it for the basis of your own applications.
![]()